I am going to be basing this on my 2003 5.3 swap into a 1985 C10, but this should be very similar for any return style fuel rail setup that is going into a vehicle that was originally carbureted. The stock fuel rail already has the fuel pressure regulator on it, so basically all you need to do is attach hoses from the tank to the fuel rail and install a fuel pump and filter in the supply hose. I opted for mounting the pump outside of the fuel tank mostly because I am lazy and it is much easier.
The LS style fuel rail has a 3/8″ input line and a 5/16″ return line. Conveniently, the C10 also used the same size lines for it’s mechanical fuel pump setup, and also had an additional line for an EVAP canister. I cut the original 3/8″ metal fuel line coming out of the gas tank near the truck’s frame, but still as close to the tank that I could mount the pump on the frame rail. Using a 3/8″ fuel hose I connected one end to the metal line with a hose clamp and the other end to a -8an hose to -8 female fitting. Make sure the fuel hose you use between the pump and the engine is rated for at least 60 psi or 4.2 bar or higher, it will be more expensive but regular fuel line is sometimes only rated for 25 psi. A lot of hoses I saw didn’t have psi ratings on them, but they did have pressure ratings listed in bar, 1 bar = 14.5 psi.

The fuel pump I used was an AEM 50-1005 380l/hr which is way overkill for stock, but I am planning on doing a turbo later. This pump needs an input adapter from -10an o-ring to -8an male to be able to connect the 3/8 fuel line from the tank, and comes with an adapter with an -8an male output. Next you will need another -8 hose to -8an female connector to attach the output to a short hose and then the fuel filter, I went to a local auto parts store and found the largest filter they had with regular hose barb fittings on both ends to avoid more costly adapters/fittings. After the filter I just connected the hose directly to the 3/8 input on the fuel rail with a hose clamp, it was difficult to get the hose past the barb so I used some silicone spray to encourage it. They make factory style connectors that go to a regular hose barb, but this is obviously cheaper. The return line will just go from the 5/16 port on the fuel rail to the original return line into the gas tank.

If you are swapping into a car that originally had a carburetor and a mechanical fuel pump there is a good chance you will have to remove a component in the gas tank if you plan on using the original tank. The stock regulator should keep your fuel pressure around 60 psi, if its way too high you will notice the engine dies at idle after a minute and the fuel pump will make strange noises. If this is the case remove the piece shown below, with the red arrow, from your fuel tank and check for a restricted return fuel line.

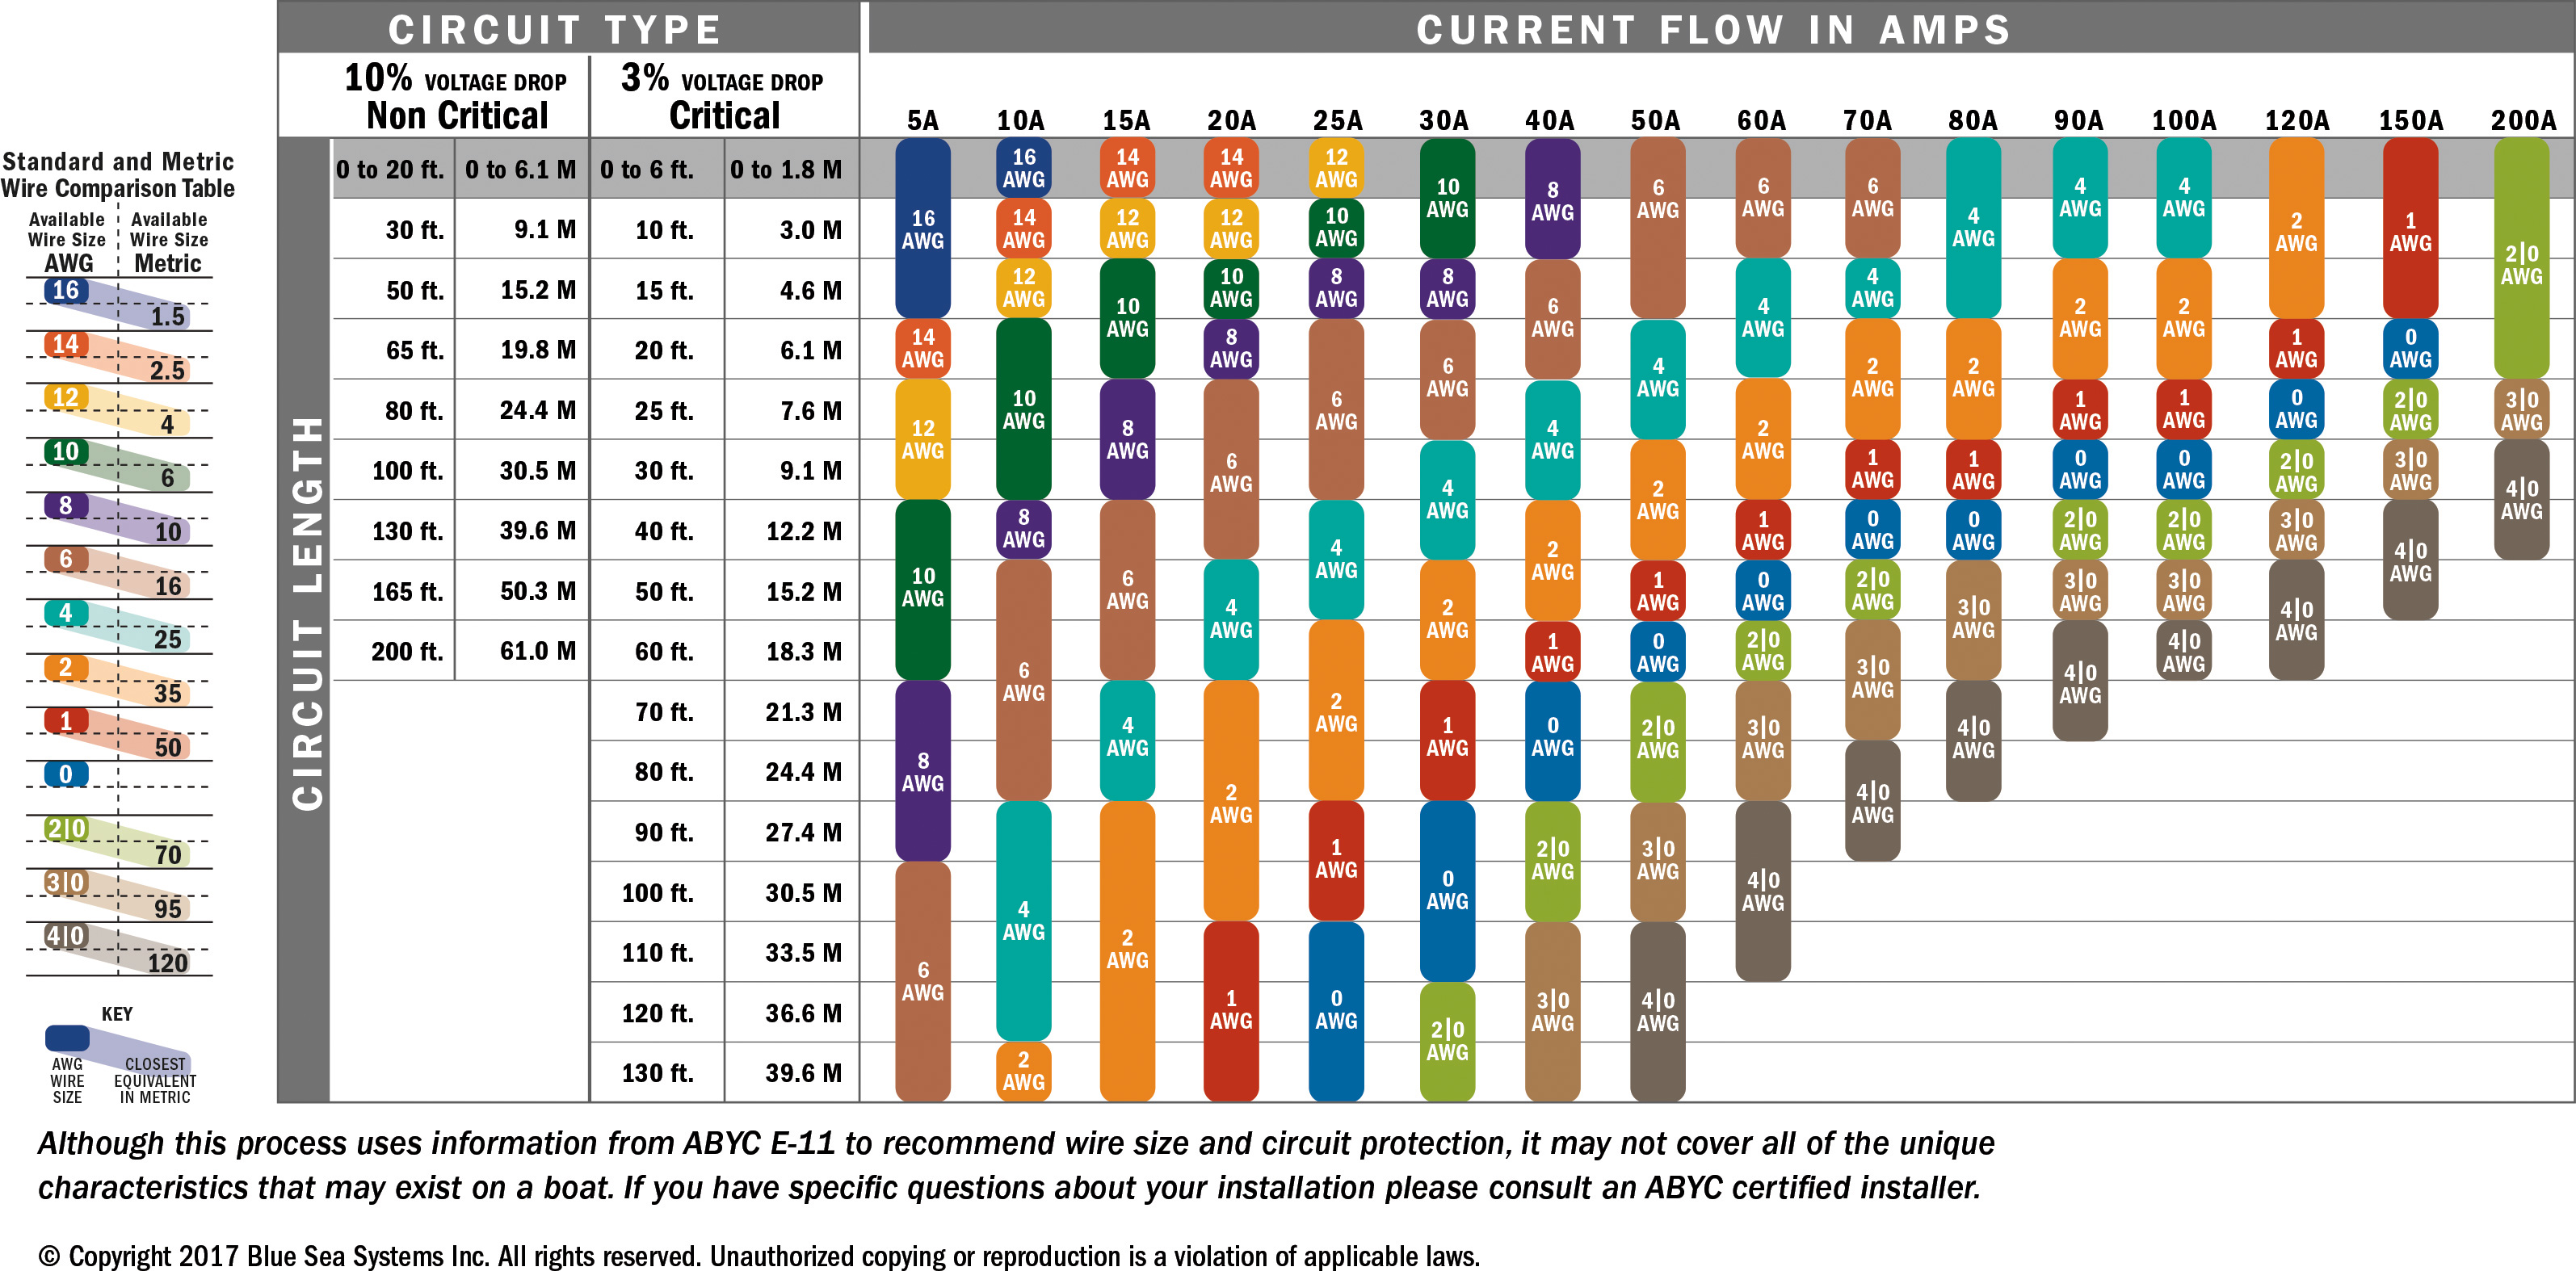
Wiring for the fuel system isn’t very difficult, the pump only has 2 connect points a + and a -. The AEM pump requires a 25 amp circuit so check this chart I found to make sure you are using large enough wire for the distance from your fuse. The stock PCM/ECU has a output wire that you can find here (99-02) or here (03-07) that you will connect to the power side of the relay coil (terminal 86 on the relay), connect terminal 85 to any ground/battery -. The switch side of the relay (terminal 30) will connect to a 25 amp fuse in your key-on powered fuse block, and the normally open (terminal 87) will connect to the + terminal on the fuel pump. Make sure the relay you use is rated for at least 25 amps DC(direct current) and is a DC relay or it will fail or not work at all. For the ground (-) side of the fuel pump I ran the same size wire as I did on the + side directly to the battery for minimum voltage drop. If your wires are too small or do not have good connections the voltage available for the pump to use will be significantly less, causing the pump to require more current, which can either blow the fuse or damage the pump.

Once you have everything connected, including all the wiring for the rest of the engine, you can connect a battery and turn the key to the on position, the computer will turn on the fuel pump for 2 seconds. Check your plumbing for leaks at this point before you start the engine.
Parts used in my build:
fuel filter
hose clamps
6.9 bar 3/8″ fuel injection hose
3.4 bar 5/16″ fuel line
heat shrink insulated butt connectors
Nice thanks!
Matt, I m doing my 1st 5.3 LS Truck motor swap into my 83 G Body Elcamino, I have an insane amount of fuel pressure on the return side and gas runs down from on top of the tank it will idle briefly and stalls. I haven’t dropped the tank yet to see where the leak is any advice on the high return line pressure. Thanks Joe
I had the same problem, You will need to remove the sending unit from the tank and cut off the bulb looking thing that is at the end of the return line. It is shown in the picture above with the red arrow. I cut mine off with a hack saw and solved the issue.